
1 Motivation
This application is part of a larger project, read Introducing Tech to A Small Dinner for more info. The objective was to provide an employee facing device to collect data and automate some of the managerial functions at the Flameburger. This article explores some of the main features of the application.
2 Benefits of Using Dedicated Device
For employee and customer facing devices, you want to limit the users to certain actions or screens. Not limiting user interactions can be problematic; for example, if you use a customer facing device to collect signatures for credit card transactions, customers can accidentally exit the application. Since this is a portfolio post, I won’t dive deep into the implementation, but I will focus on exploring the design aspects and the things I could have done better. Here’s how I used dedicated/COSU device policies:
- Lock Task Mode: Lock employees into a single application. They can not close the application or navigate away from it.
- Disable System Updates: Disable automatic system updates, so it won’t disrupt the workflow or cause unexpected behavior. Updates can be done manually.
- Disable System Dialogs: Messages such as a WIFI network is available or low battery can also be disruptive. I provided my own dialogs under certain conditions.
- Disable USB debugging: In production, the application data may contain sensitive data, so it’s imperative to disable debugging shall the device itself get stolen. I also add the ability to wipe the data remotely.
- Disable other services as needed.
3 The Hardware Used
A Lenovo tablet along with a 2D barcode scanner are used; both are connected using a USB HUB Adapter. The barcode scanner is used to read key tags or employees’ ID cards and scannable plastic gift cards. The total cost of this setup amounts to about $230. The barcode scanner works over Bluetooth as well; my initial design was to use it wirelessly, and I wrote an Android service to establish connection and retrieve data, but the scanner used kept losing connection, so I determined that’s not reliable for this use case. The problem could be solved by buying a high end scanner such as Honeywell or Motorola, but doing so compromises my objective of keeping costs at minimum. Hardware used is listed below.
- $145 Lenovo Tab 4, 10.1” Android Tablet
- $70 Inateck Bluetooth Barcode Scanner
- $9.9 TUSITA Micro USB HUB Adaptor
4 Android Application Features
The application is designed primarily to collect business data. Employees are assigned permissions and tasks to fullfil. First order of business is to ensure each employee is only responsible for the data they provide and their information is protected from other employees and/or intruders.
4.1 Login and Logouts
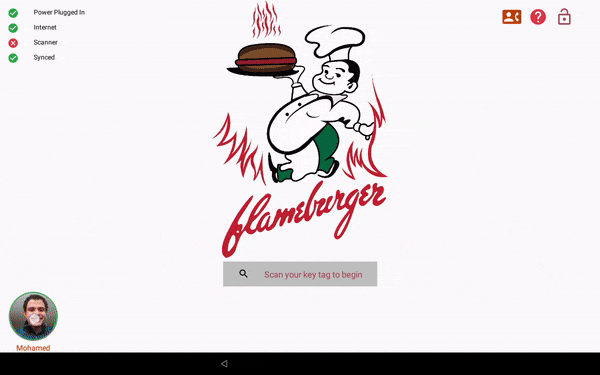
A key tag is a plastic scannable card that usually fits into your key chain. You may have used one to check in at your local gym or earn rewards at your local Walgreens. Logging in for employees is as easy as scanning their key tag. However, I designed the application with the assumption that users will put away their key chain after their initial login. Quick Access is another way to quickly login and here how it works:
- All employees are sent a randomly generated 6-digit PIN code once they’re added to the system. The code is sent via SMS to the cell number they provided.
- All employees at this facility are required to clock in once they start working. Once clocked in, their name along with an avatar shows on the main screen of the app.
- Clocked In employees can click on their avatar to use Quick Access to login. Quick Access asks only for the 6-digit PIN code and then takes them to the logged screen if provided a valid PIN. A GIF demo shown below.
A last resort for login is called Manual Access. This is to account for the case where the barcode scanner is malfunctioning or the employee forgot his key card. This will require the employee to type in both his ID number and PIN code.
The first screen appears after an employee logs in is called the Employee Panel. It gives access to each employees to perform tasks permissible to him or required of him. It also gives him access to a personalized menu. The menu is split into two parts. One part is store-related records and the other part is his preferences such as changing his PIN code, contact info, emergency contact, and his avatar.
All employees are encouraged to log out after they’re done performing the desired tasks. On the Employee Panel, a floating action button is present to take them back to the main screen. If they forget to do so however, all employee-related screens are timed. A timed screen/activity will expire after a given amount of inactivity time. This is important to protect the employee personal data and strict business data.
Possible Improvements:
- There’s a lot of improved tools that can be used to log in employees such as using Near Field Communication (NFC). Using NFC will entail sending a digital ID card to each employee and the card can be stored in a digital wallet. The digital card can then be used by bringing the employee’s phone close to the device, and the device then reads all required data from the card. However, this is more complicated than it seems.
- The Quick Access dialog can be much improved by integrating a custom keypad into the dialog itself to become one fragment. This can be easily done since we only use 0-9 along with clear and backspace keys. It will give much cleaner look and better UX.
4.2 Tracking Work Hours
One of the main functions this app provides is tracking the employees’ work hours. While implementing such function should be as simple as clocking in and out, a lot of corner cases should be accounted for. For example, an employee clocks in but never clocks out. Another is what happens if an employee neither clock in or out. To account for such cases, here’s an overview of the design.
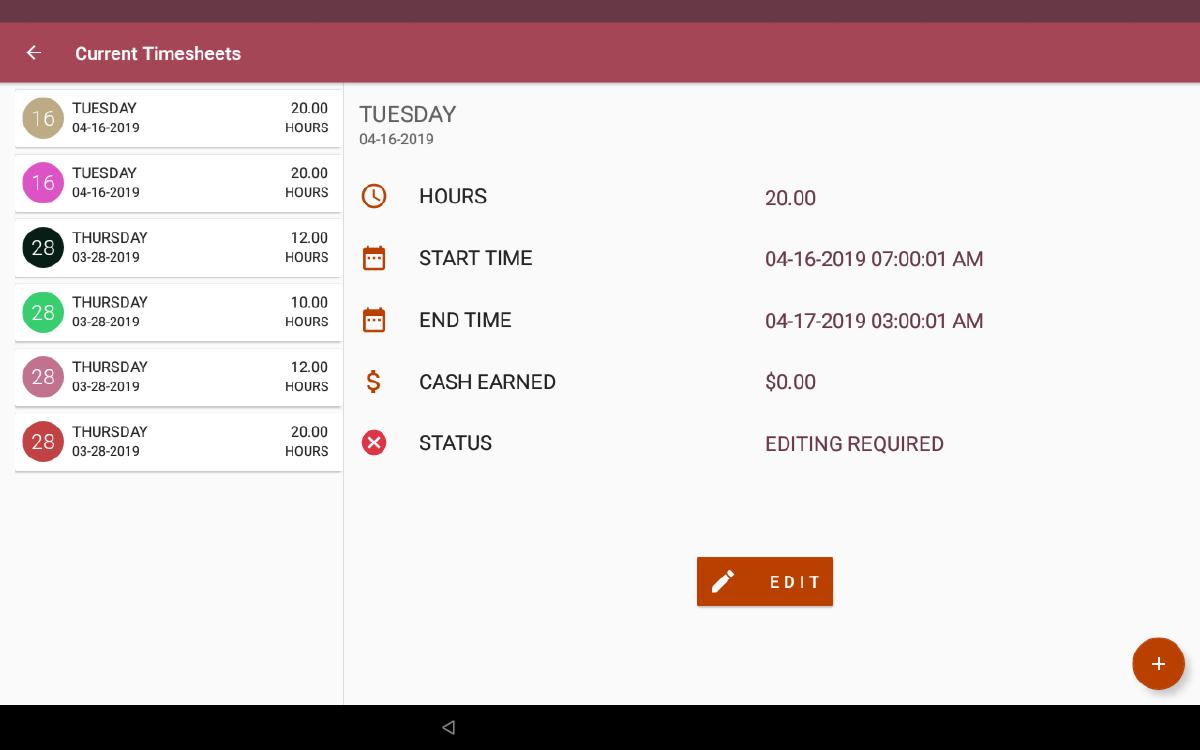
- The records responsible for tracking time worked are called Time Sheets.
- A Time Sheet record shows
time started,time ended,duration,date, andrecord status. - A Time Sheet has a minimum duration of 15 minutes.
- A Time Sheet has a maximum duration of 20 hours. This accounts for people clocking in but not out. The Flameburger is 24 hours diner, and it’s not unusual for some of its staff to work double shifts (16 hours). However, when an employee exceeds the 20 hours threshold, the Time Sheet record is retained with a status “Editing Required.” When such record is created, the employee is sent an email notification.
- Employees can edit and manually add Time Sheets within the current pay period.
- All edited and manually added Time Sheets are subject to managerial approval.
- After the end of each pay period, Time Sheets are processed. Only Time Sheets with a valid status is counted toward employee pay; others are discarded. All processed Time Sheets are archived with the
statusattribute replaced with the date the record was processed.
Possible Improvements:
- Adding edit history to each Time Sheet, so the manager/owner can see what type of change was made and when before approving or declining changes.
- Adding an attribute with the hourly rate to support multiple roles/jobs per employee. If a diner for example have an employee who works both as a cashier and a server with each job has its pay rate, the pay rate has to be associated with the hours worked.
- UI needs improvement to indicate which record from the list (RecyclerView) is being shown. Also, most employees like to see a running total of their hours.
4.3 Tracking Employee Payments
Once time sheets are processed, a payment record is generated. A payment record will show the gross pay of the employee, payment rate, salary if any, bonuses if any, regular hours, overtime hours, cash earnings (tips), pay period start date, pay period end date, and payment due date.
Payment records are generated by the backend server. The Android application fetches the data from a secured API. Each employee can view his payment history and each payment in details. The owners utilize a front-end application to manage the data; using the front-end application, owners can trigger the payment processing. Processing the payments follows these steps:
- Sum up all hours for each employee along with their cash earnings.
- Calculate payment and generate a payment record for the result.
- Archive Time Sheet records included in the payment. Notify the store device, this Android app, to do the same.
- Generate a PDF document with a summary of payments due. Owners can download, email, or delete said documents which is securely stored. An example document, with no bonuses or salaries, can be found here.
Possible Improvements:
- The owners of this diner used an external accounting office to handle their payroll. If the payroll to be handled in house, this record will need to expand to accommodate all attributes of a pay stub. If an accounting software such as QuickBooks to be used, we can account for a full integration in the design.
- If the accounting to be handled in house, the app can provide a function for employees to provide their bank info for ACH transactions. Another function for employees to request a pay stub for a given duration can be implemented as well.
4.4 Tracking Business Sales
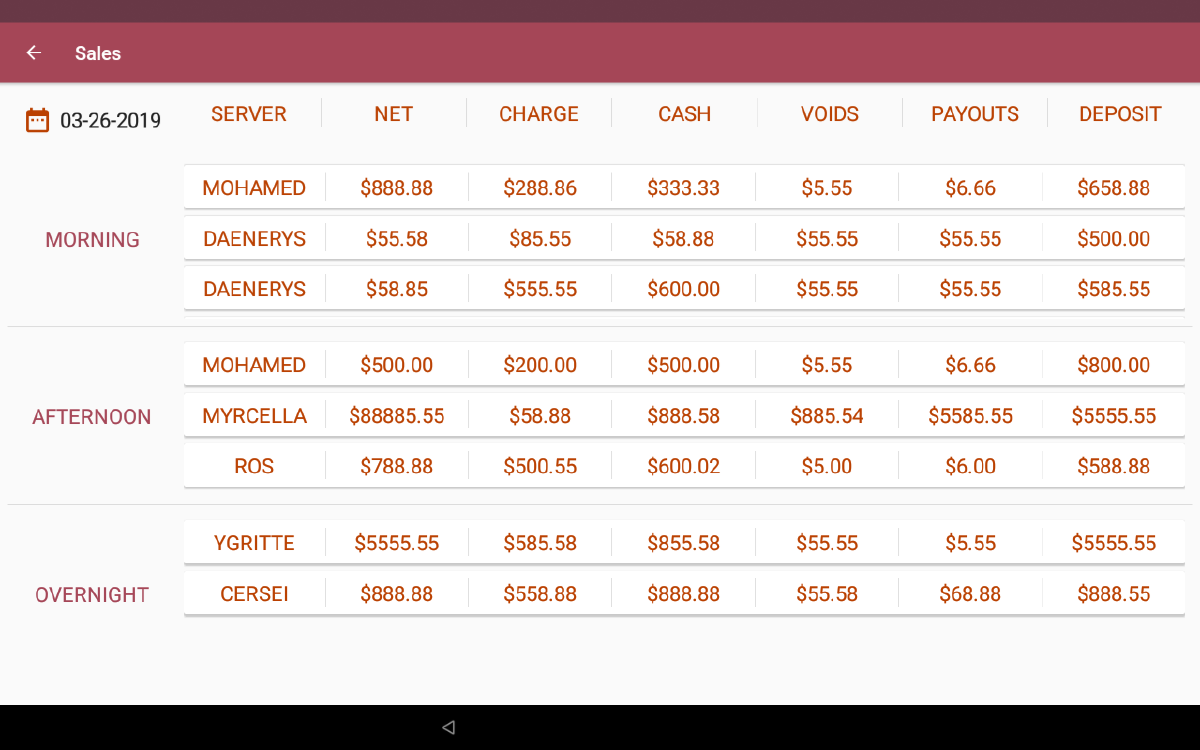
The Flameburger didn’t use a POS at the time of deploying this application. Sales data was collected using a traditional sales book. We wanted to collect as much data as we can about the sales since it’s of utmost importance to decision making. The sales module was designed with care starting with the database schema. A well-designed schema will facilitate aggregating data to acquire valuable insights into the business performance. An example is ensuring a shift attribute which can tell us which shift is the busiest all the time, in a given day of the week, in a given month, or in a given year. Here’s the features of the sales module:
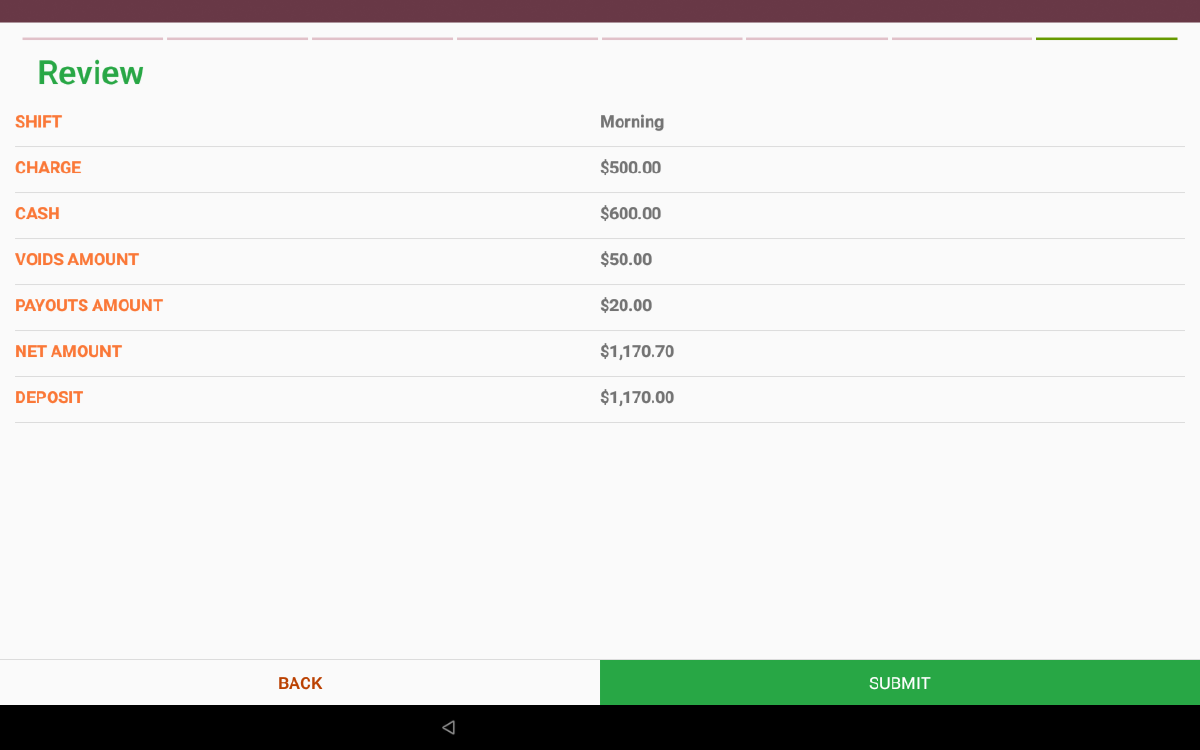
- A step by step submit sale wizard. Some of the sale fields are calculated using others but can be overridden.
- Tracking of special transactions such as voids, payouts, cash deposits, and gift card (deferred payments) if implemented.
- Meta data are generated in the background. A sale ID is assigned to each entry to help owners track deposits.
- Employee with View Sales permission can view sales data.
Possible Improvements:
- More data can be collected to enforce a better system of control over cash flow. An example would be printing out a deposit slip and a payout slip which can be signed by more than one employee.
- Add sales tax attribute and distinguish gross sales from net sales. This setup was extracted from the sales book and intentionally made similar to facilitate the switch to a new system for the staff.
- The view sales UI can be improved by adding a total to each shift along with a day total to serve as a summary of sales.
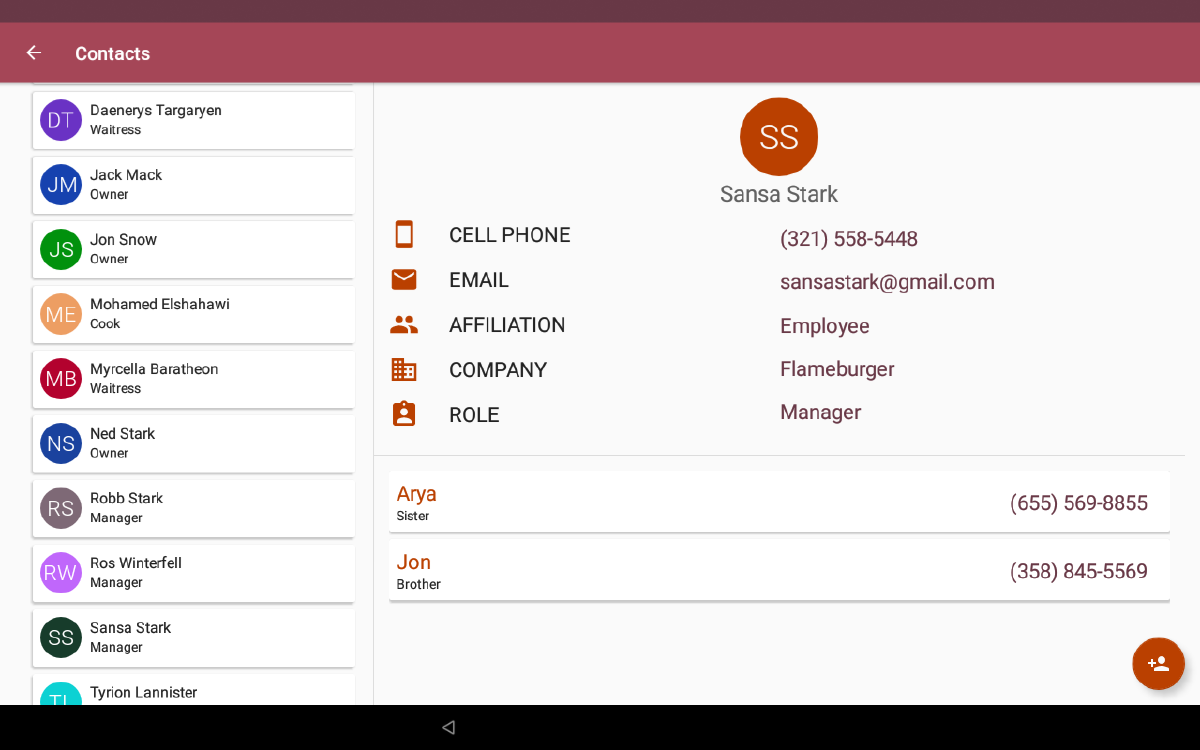
4.5 Tracking Business Contacts
In a 24 hours diner, employees can often need to contact someone who’s an employee or a designated maintenance company. A contact icon can be seen on the main screen which leads to a list of all business contacts. Each newly added employee will be automatically shown in the list. When an employee is terminated, they’re removed from the list. Anyone with physical access to the device can add new contact, but it will be subject to owners’ approval. Flameburger employees will also have their emergency contacts shown. It’s important for any workplace to have someone to call in case of emergency to any of their staff.
Possible Improvements:
- Like other Two-Pane UIs, the selected record needs to be highlighted in the list.
- For emergencies, we should consider collecting medical info. This info will be only available to managers.
4.6 Offline Operation
All data collected on this Android app is sent to the cloud. In my design, the database server is the absolute source of truth. Many parts of the application needed to be functional all the time regardless of internet connectivity. To achieve this functionality, some data is stored locally and synced with the cloud. The implementation involves creating two-way communication channel between the device and the backend server. The device uses HTTPS requests to contact the server, and the server uses cloud messaging to contact the device. It’s important to note that no sensitive information was sent over cloud messaging. I developed my own protocol of how the data will stay in sync, and it has worked very well as no data conflict happened while the application was in production.
5 Conclusion
This Android application was in production for a year. A crash-free year except for a single incident which was patched right away. The application was designed with over 12 endpoints in mind and tens of screens. The intention was to progressively add new features with every new release. While interacting with other dedicated devices, I was inspired by some of their UI designs. I gained a lot of new expertise in many fields during each phase of the development cycle of this app. This was one man effort for which I was responsible for functionality, user interface, and user experience. I’m pleased with my work and acknowledges that there’s room for improvements. The staff was overall pleased with the work as well. A lot of my content here will be influenced by this project and the new perspective I gained from it. I continue to benefit from the codebase for other projects, and I may open source the whole project sometime in the future.